I. Overview
Gangchun laser head can be connected to most types of lasers. The interface types for connecting the laser head to the laser include QBH, QCS, QD, Q+, etc. The mainstream interface on the market is QBH. The default interface of Gangchun laser head is QBH interface. If you need QCS, QD, Q+ interface, you can also customize it.
The QBH of the Gangchun laser head is located at the top of the laser head. It is an important component connecting the laser head and the laser. Please blow off the dust on the QBH fiber interface and the protective cap with clean air to ensure that there is no dust residue during installation.
Please try to complete this installation process in a short time to prevent dust and dirt from entering the laser head.
2. Material preparation
3. Optical fiber cleaning
(1) Put the optical fiber
Unfold the laser fiber so that the length of the fiber connector can reach the farthest end of the machine movement, and the fiber cannot be twisted to avoid breakage caused by long-term movement. Protect the optical fiber connector with a fiber protective cover (as shown in Figure 1), and properly position the optical fiber. At the same time, please protect the water pipe on the optical fiber connector to avoid blockage by foreign objects.
(figure 1)
(2) Clean the optical fiber
Place the dust box near the laser head installation location, turn off the air conditioner or fan to reduce air flow.
Put the optical fiber connector into a dust-free box or a clean tabletop, use a dust-free wiping cloth with isopropyl alcohol, and wipe the outer surface of the laser head, optical fiber connector, microscope, cable and water pipe near the optical fiber connector with a dust-free cloth (such as Figure 2), make sure that the area near the fiber connector does not raise dust.
(Picture 2) Operators should wear rubber gloves, wash their hands, and keep their hands clean and dust-free
Four, laser head cleaning
Take out the laser head, put the laser head into a dust-free box, clean the surface of the laser head with a dust-free wiping cloth, especially the surface of the QBH interface, the surface of the collimation protection lens module, and the surface of the focus protection lens module to ensure that there is no dust (Figure 3).

(image 3)
Five, insert the fiber
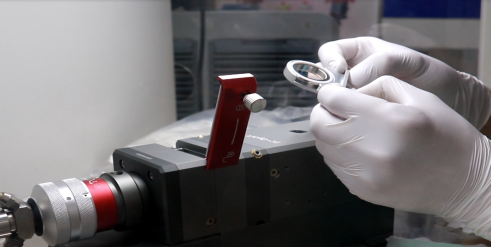
Open the optical fiber dust cover, and wipe the surface of the optical fiber connector, the card slot and the cross section of the optical fiber with a cotton swab moistened with isopropyl alcohol. After cleaning, check the section for dust with a flashlight or microscope (as shown in Figure 4), and make sure that it is dust-free and placed horizontally for later use.
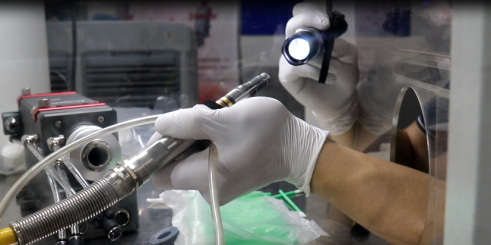
(Figure 4)
Clean the QBH connector of the laser head with a cotton swab dipped in isopropyl alcohol, and open the QBH dust cover to ensure that there is no dust. Wipe the QBH with a cotton swab dipped in isopropyl alcohol.
(1) Connection of optical fiber and laser head
Steps:
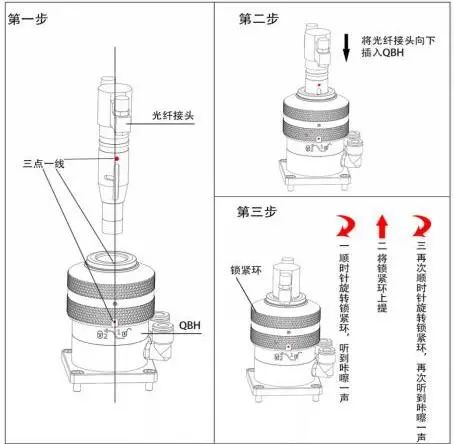
1. Place the laser head horizontally to prevent dust from falling in, and align the clean optical fiber connector with the QBH jack.
2. Find the two red dots on the QBH and one red dot on the fiber connector.
3. Align the three red dots to form a straight line. (If the three red dots are difficult to align, please refer to adjust the QBH angle first)
4. Insert the optical fiber plug into the QBH.
5. Rotate the QBH locking ring clockwise to fix it, lift the locking ring, and turn the locking ring clockwise again to complete the lock.
6. Check whether the optical fiber is tightly locked.
(2) Adjust QBH angle
If the angle of the red dot on the optical fiber and the red dot on the laser head interface is too far apart when the optical fiber connector is inserted into the interface, it is impossible to align the insertion. At this time, you can refer to the following steps to adjust the position of the optical fiber interface on the laser head to solve this problem. as the picture shows.
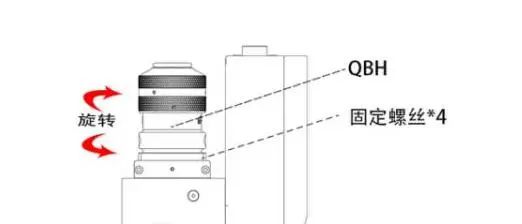
Use a wrench to loosen the 4 lock nuts at the position shown in the part as shown in the figure. Be careful not to unscrew the screws. Rotate the QBH interface and tighten the screws when they are in place.
Steps:
(1) Unscrew the four hexagon socket head fixing bolts.
(2) Rotate the angle of the QBH adapter block until the QBH red dot is opposite to the optical fiber red dot;
(3) Tighten the 4 fixing bolts.
Sixth, do dust-proof treatment
(1) Dust investigation
After inserting the fiber, take out the cutting head from the dust-free box and shake it vertically downwards slightly (the fiber and QBH are worn out during the insertion process and there is the possibility of small metal particles) (Figure 5), and put it in the dust-proof box again. Open the upper protective cover, unscrew the protective drawer bolts with an inner hexagon, and check whether any worn particles have fallen into the protective mirror. After ensuring that there is no dust, reinstall the protective compartment and close the protective compartment cover tightly (as shown in Figure 6).
(图5)
(Image 6)
(2) Dust-proof treatment
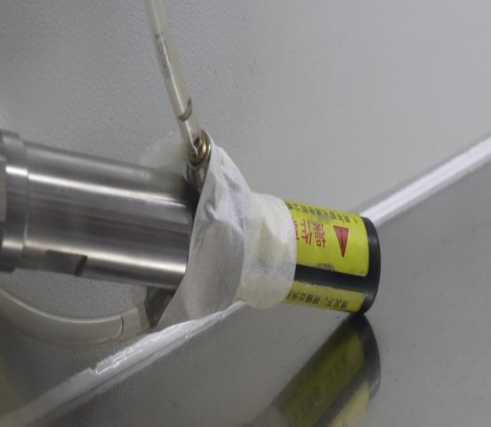
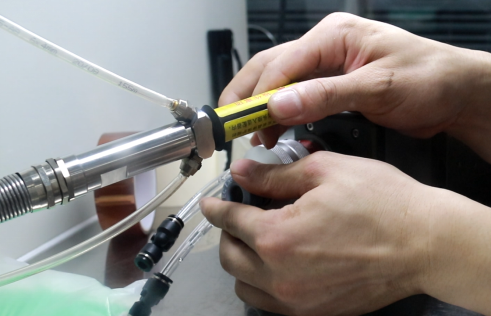
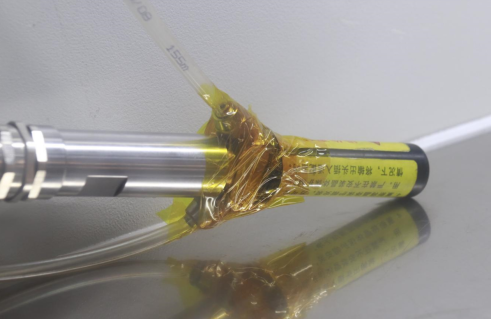
1. Seal the upper/lower protective lens module of the laser head and the joint of the body with gold finger tape to prevent dust from entering the laser head during use (as shown in Figure 7).
2. Use golden finger tape to seal the interface between the optical fiber plug and the laser head (as shown in Figure 7).

(Picture 7)
Seven, connect the water pipe
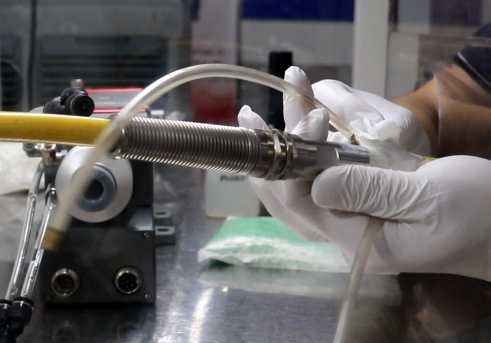
Keep the water cooler in a closed state, connect the fiber connector and the water pipe of the laser head, turn on the water cooler, and check whether there is water leakage at the water pipe joint, and ensure that the water path is well sealed (Figure 8).

(Picture 8)
8. View the red light
Turn on the main switch of the laser, turn on the key switch, start the guiding red light of the corresponding channel in the shutter, and observe whether the laser head outputs red light. If you can see the red light, it indicates that the optical fiber path is in good condition and you can enter the use state (Figure 9) ).
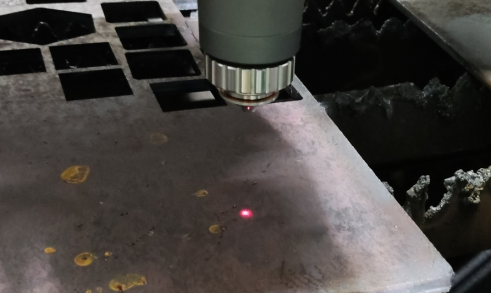
(Picture 9)
9. Disassembly of optical fiber and laser head
(1) Water and electricity cut
Turn off the water chiller and stop the water flow. Turn off the laser key switch, and then turn off the laser main switch to stop the laser. Turn off the machine tool to stop the laser head from working.
Remove the cooling water pipe of the fiber connector
Prepare the water container, absorbent paper or cloth, and short-circuit the cooling water pipe before removing the quick plug. Make sure that the water cooler has been shut down and the water flow in the water pipe has stopped, because when the water pipe is unplugged, there is residual water pressure in the water pipe and it will overflow slightly. A small amount of water, catch the water with a water receiving box, and wipe it clean with absorbent paper or cloth. Short-circuit the cooling water pipe with a quick plug or directly tie it with a cable tie to prevent water from flowing out of the pipe.
(2) Pull out the optical fiber
Operators wear rubber gloves to wash their hands and keep their hands clean and dust-free. Prepare the protective cover of the laser head, optical fiber cap, clean compressed gas, dust-free wipes, isopropyl alcohol, turn off the air conditioner or fan to reduce air flow. Dust-free wipes are sprayed with isopropyl alcohol, and the outer surfaces of the laser head, optical fiber connectors, and cable water pipes near the optical fiber connectors are wiped clean with a dust-free cloth to ensure that the area near the optical fiber connectors does not raise dust.
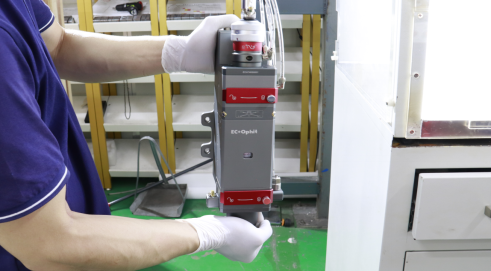
Put the laser head connected to the optical fiber into a dust-free box or a clean desktop, clean the laser head protective cover and optical fiber cap with a dust-free cloth, and then use clean compressed gas to blow off the floating dust of the protective cover and optical fiber cap, and adjust the position of the laser head. Place the laser head horizontally with the laser head socket facing horizontally, so that dust will not fall into the laser head and contaminate the lens when inserting and removing the optical fiber (see Figure 10).
Unplug the fiber connector. First, seal the laser head with a clean protective cover as soon as possible. Then, seal the fiber connector with a fiber cap as soon as possible.
(Figure 10)
(3) Handling optical fiber connectors
Prepare the golden finger tape to dust-proof the fiber protective cover and the fiber interface, which is convenient for next use (Figure 11).
(Figure 11)
Return the fiber from the laser head position to the laser position carefully to avoid twisting, falling, or stepping on it. The minimum bending radius of the fiber without stress is 0.1m. Excessive bending will damage the fiber. We stipulate the minimum bending limit allowed when coiling the optical fiber. This stipulation is not defined by the bending radius, but calculated by the length of a coil of 1.5m. Avoid breathing and talking towards the opened laser head socket to prevent saliva from flying. Foam enters the optical head.


